
White Chocolate Peanut Butter Balls

Salted white chocolate peanut butter balls — an easy, no-bake holiday treat that balances creamy peanut butter with sweet white chocolate and flaky sea salt.
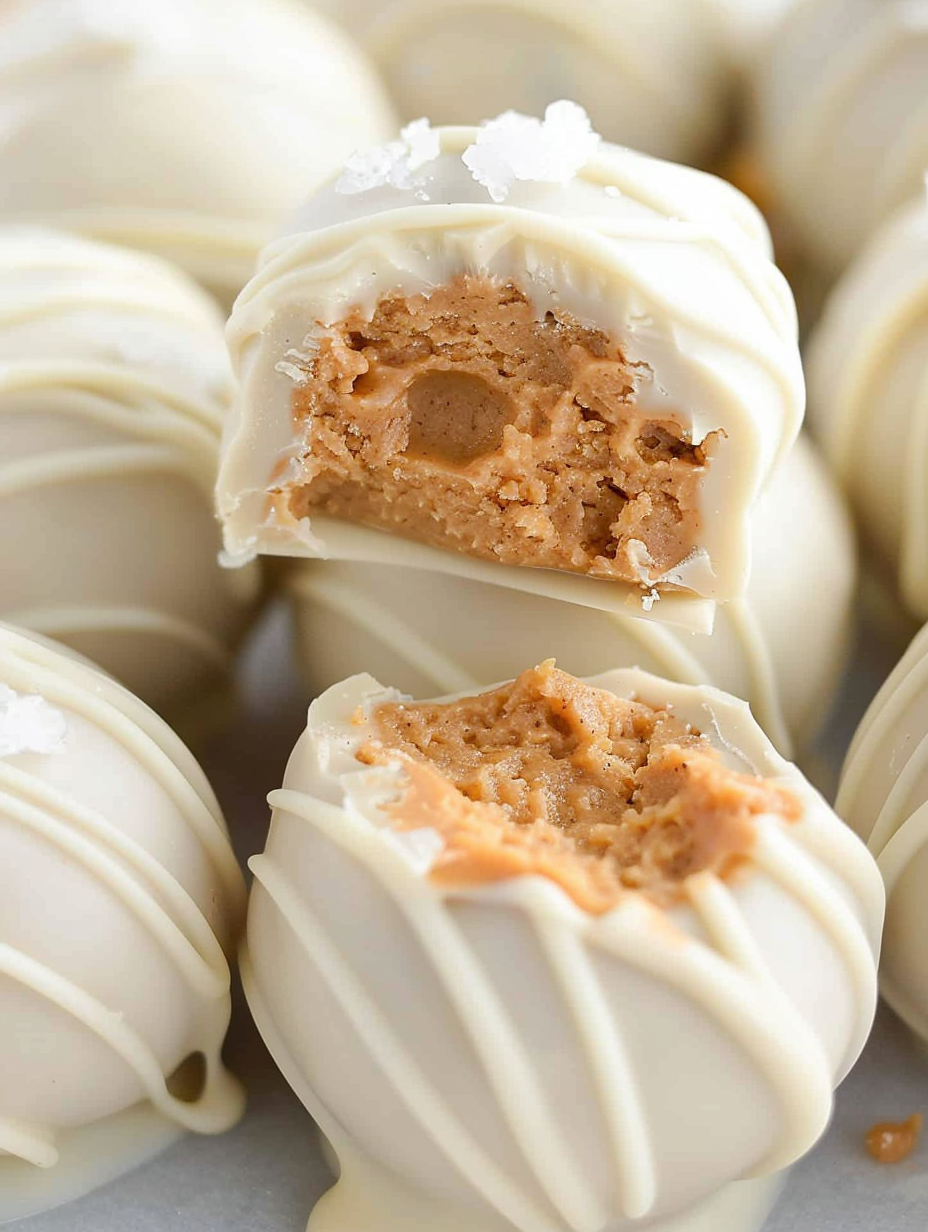
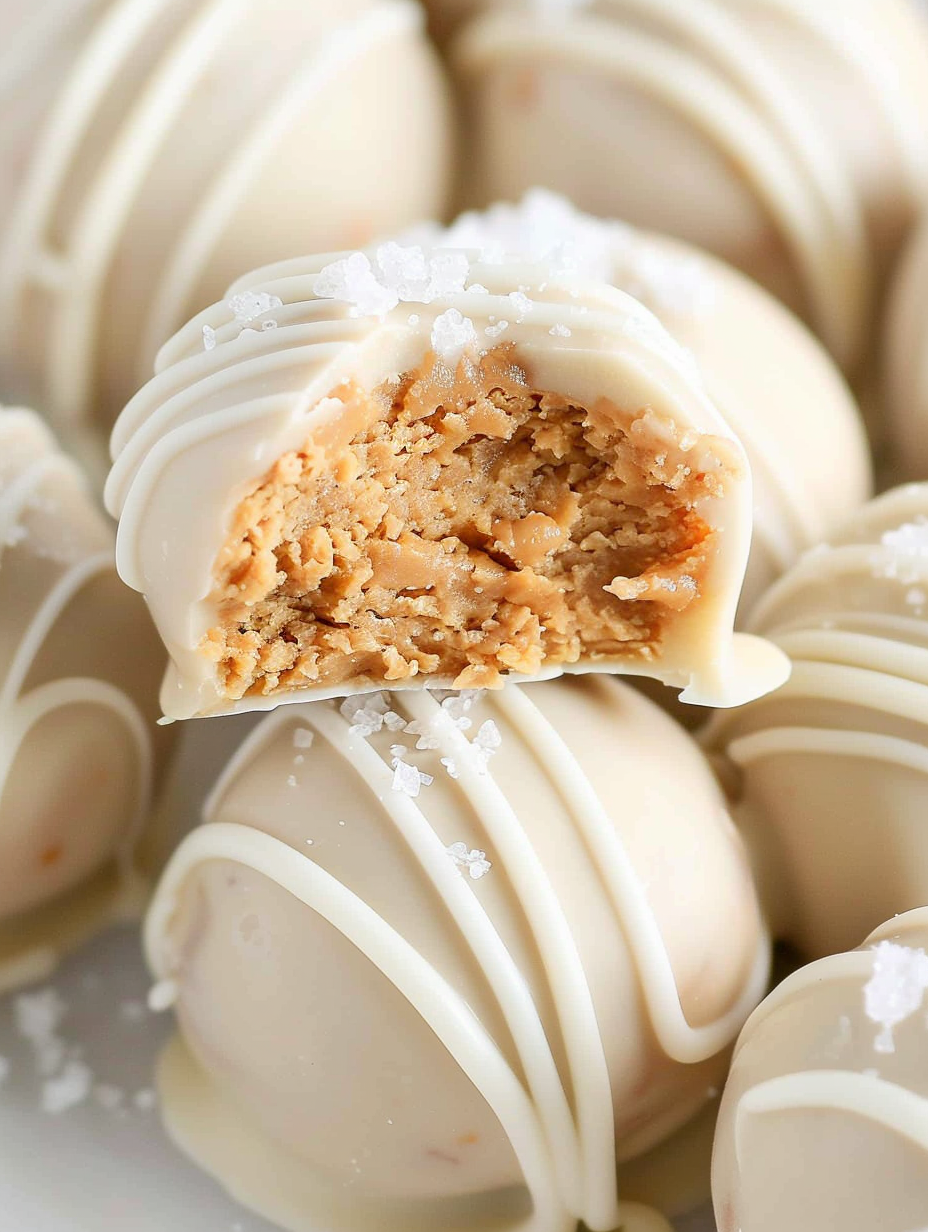
This recipe for salted white chocolate peanut butter balls has been my go-to holiday treat for years. I first made these on a chilly December evening when I wanted something festive but quick — a sweet bite that didn’t require an oven and could be assembled while listening to holiday music. The result was an immediate hit: a tender, slightly chewy peanut butter center coated in smooth, sweet white chocolate with just a hint of flaked sea salt on top. They feel indulgent but are simple enough to make in a single sitting, and they travel well to cookie swaps and family gatherings.
I love how the textures come together — the dense peanut butter interior contrasts with the glossy exterior, and the salt flakes lift the sweetness so each bite feels balanced. I often make a double batch for parties because guests always ask for more. These are also perfect for gifting: place a few in a small box with tissue paper and they look special despite being effortless. Over the years I’ve tweaked the balance between sugar and coconut flour to get the best hold and mouthfeel, and the version below is the one that consistently earns compliments.
Why You'll Love This Recipe
- Quick and no-bake — ready to assemble in about 30 minutes plus a short chill time, perfect for busy holiday afternoons.
- Uses pantry staples like creamy peanut butter, powdered sugar, and white chocolate chips — easy to shop for and ideal for last-minute treats.
- Balanced flavor — the sweetness of white chocolate is offset with flaked sea salt for a refined finish that keeps each bite from tasting cloying.
- Texture contrast — soft, slightly dense centers coated in a crisping candy shell deliver an irresistible mouthfeel.
- Make-ahead friendly — they firm up in the fridge and freezer, so you can prepare them a day or two ahead for parties or gifts.
- Crowd-pleasing and kid-approved, yet elegant enough to bring to grown-up gatherings when plated with a sprinkle of cocoa or extra sea salt.
When I first made this, my family gathered around the counter to taste-test the prototypes; my nephew declared them "magic balls," and that name stuck for a few years. I learned early to chill the centers before dipping to prevent a melted coating and to use a mini cookie scoop for consistent sizing — it’s those small details that make the process smooth and the finished treats look professional.
Ingredients
- Creamy no-stir peanut butter (3/4 cup): Look for a brand labeled "no-stir" or natural with oil already blended so the centers are smooth and not greasy; Skippy No-Stir or Jif Natural work well. Avoid crunchy varieties to maintain a silky texture.
- Cane sugar (1/2 cup): Adds subtle grain and sweetness to balance the peanut flavor; cane sugar retains a slightly deeper flavor than refined white sugar. If you prefer finer texture, pulse it briefly in a food processor.
- Salt (1/8 teaspoon): A small amount inside the mixture deepens flavor; use fine table salt or a light pinch of kosher salt adjusted to taste.
- Coconut flour (1/4 cup): Absorbs moisture and gives the centers structure without making them cakey; if you don’t have it, see substitutions section below.
- Powdered sugar (2 tablespoons): Lightly sweetens and helps with binding; sift it if it’s clumpy.
- White chocolate baking chips (2 cups): Choose a high-quality baking chip such as Ghirardelli or Callebaut couverture-style chips for better melting and smoother shine.
- Flaked sea salt for topping: Maldon or any flaky sea salt offers a clean crunch and attractive finishing touch.
Instructions
Combine the filling:In a mixing bowl, beat together 3/4 cup creamy no-stir peanut butter, 1/2 cup cane sugar, 1/8 teaspoon salt, 1/4 cup coconut flour, and 2 tablespoons powdered sugar until fully combined and smooth. Use a stand mixer or hand mixer on medium speed for 45–60 seconds; scrape down the bowl so there are no streaks. The mixture should hold together without being sticky.Portion the truffles:Use a mini cookie scoop (about 1 tablespoon) or your hands to portion the mixture into even balls. Roll between your palms to smooth the surface and place each ball on a baking sheet lined with wax paper. Aim for 10–12 balls; consistent sizing ensures even chilling and coating.Chill the centers:Place the baking sheet in the freezer for 20 minutes. Chilling firms the centers and prevents the melted chocolate from warming and becoming streaky during dipping. If you prefer, chill in the refrigerator for 30–40 minutes instead, but the freezer speeds things up and is reliable.Melt the white chocolate:Place 2 cups white chocolate chips in a microwave-safe bowl. Heat in 20–30 second increments, stirring in between, until completely smooth; total time is usually 60–90 seconds depending on microwave strength. Avoid overheating — white chocolate burns easily and will become grainy.Dip and finish:Remove chilled centers from the freezer. Using a fork or dipping tool, submerge a peanut butter ball in the melted white chocolate, spoon extra chocolate over to coat if needed, then lift and gently tap the fork against the bowl to remove excess. Transfer back to the wax-paper-lined sheet using a toothpick to guide it off the fork. Immediately top with a small pinch of flaked sea salt.Set and drizzle:Refrigerate the coated balls for 15 minutes to fully set the chocolate. Warm any remaining chocolate gently and transfer to a small zipper bag; snip a tiny corner and drizzle over the set candies for texture. Return to the fridge until the drizzle is hardened and the centers are completely cold.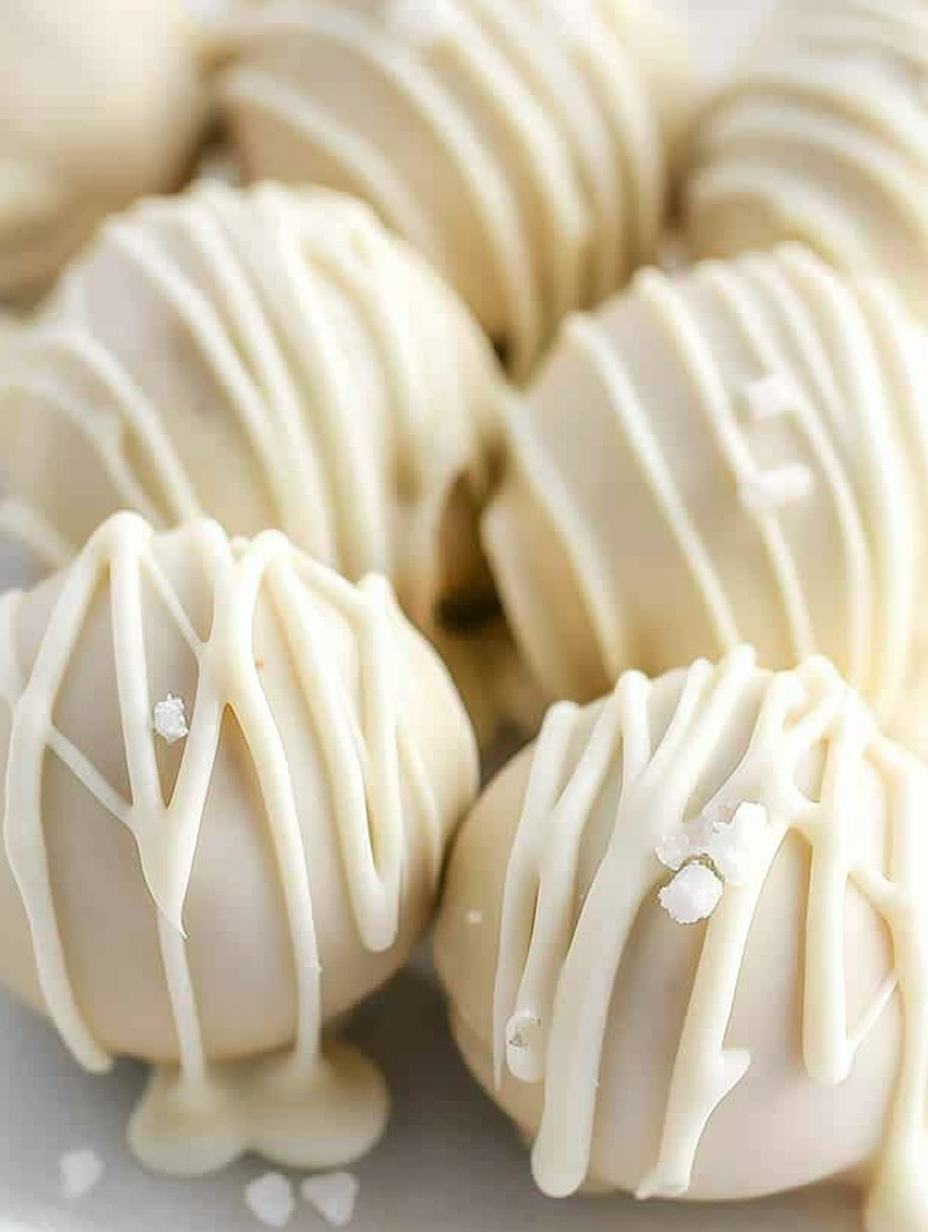
You Must Know
- These hold well in the refrigerator for up to two weeks when placed in an airtight container with parchment layers to prevent sticking.
- They freeze beautifully for up to three months; thaw in the refrigerator for several hours before serving to preserve texture.
- Because white chocolate contains dairy and often soy lecithin, this is not dairy-free or soy-free unless you use specialized vegan white chocolate.
- Chilling the centers before dipping is critical — skipping this step can cause the coating to crack or look streaky because the warm chocolate will heat the interior.
- Use a good-quality white chocolate for the smoothest coating and the best visual finish; cheaper chips often bloom or grain when melted.
My favorite part of these is how the little flakes of sea salt transform each bite; a single flake contrasts with the white chocolate’s sweetness and the peanut butter’s richness. Family members have told me these are reminiscent of candy-shop truffles, and I take pride in that because they’re assembled with simple tools. I often bring them to potlucks in small paper liners, and they disappear first every time.
Storage Tips
Store finished candies in a single layer or separated by parchment in an airtight container in the refrigerator for up to two weeks. For longer storage, freeze on a tray until solid, then transfer to a freezer-safe box with parchment between layers; they’ll keep well for up to three months. When refrigerating, allow them to come to room temperature for 10–15 minutes before serving so the centers soften slightly and flavors open. Avoid storing near strong-smelling foods — both white chocolate and peanut butter can absorb odors.
Ingredient Substitutions
If you don’t have coconut flour, substitute 1/4 cup almond flour plus 1 tablespoon powdered sugar to retain structure, though texture will be slightly denser. For a dairy-free version, use vegan white chocolate chips made from cocoa butter and a dairy-free peanut butter alternative (though this changes the classic flavor). To reduce sugar, replace cane sugar with an equal amount of monk fruit sweetener that measures like sugar and adjust to taste. Crunchy peanut butter will change the mouthfeel but can be used if you prefer a little texture.
Serving Suggestions
Serve these on a simple white platter dusted with cocoa or powdered sugar alongside dark chocolate bites for contrast. They pair well with coffee or a nutty dessert wine; for holiday parties, arrange them in paper candy cups and add a ribboned box for gifting. Garnish with extra toasted chopped peanuts for a rustic look, or add a tiny bit of melted dark chocolate drizzle to pique contrast. For a party buffet, include a small label noting common allergens so guests can choose accordingly.
Cultural Background
Chocolate-coated nut confections have a long history in many cultures as a portable, celebratory sweet. Peanut butter candies are particularly American in origin, flourishing alongside peanut butter's rise in the early 20th century. White chocolate itself is a more modern invention — technically a confection made primarily from cocoa butter, sugar, and milk solids — which introduces a creamy sweetness that contrasts with the savory-nutty American peanut-butter tradition. These balls combine those elements into a holiday-friendly bite that nods to classic American candy making.
Seasonal Adaptations
In winter, add a pinch of warm spices like 1/8 teaspoon ground cinnamon or a tiny dash of nutmeg to the filling for a cozy twist. For spring or summer, swap the white chocolate for 2 cups milk or dark chocolate for a richer profile and top with crushed freeze-dried raspberries for color. For Halloween, tint a small portion of melted white chocolate with oil-based food coloring and drizzle in orange or purple. The technique remains the same; only the finishing details change to fit the season.
Meal Prep Tips
These are excellent for make-ahead gifting and weekly snacks. Assemble and freeze the centers on a tray, then transfer to a sealed container; when ready to finish, thaw slightly and dip in melted chocolate. For faster assembly, set up an assembly line: portion centers, chill, melt chocolate, dip, and top. Use a mini scoop for uniform size, and keep an extra bowl of hot water nearby to warm utensils and prevent chocolate from setting while you work. Label containers with the date so you rotate older portions first.
These salted white chocolate peanut butter balls are an effortless yet elegant treat to share. They combine pantry-friendly ingredients with a few professional tips so anyone can make them look and taste delightful — try them once and you’ll find yourself returning to this simple formula for holidays and weeknight sweets alike.
Pro Tips
Chill centers thoroughly before dipping to prevent the coating from cracking or melting.
Use a mini cookie scoop for uniform sizes so all pieces set evenly and look professional.
Melt white chocolate slowly in short bursts and stir frequently to avoid burning; if seized, add a small amount of vegetable oil to smooth it.
This nourishing white chocolate peanut butter balls recipe is sure to be a staple in your kitchen. Enjoy every moist, high protein slice — it is perfect for breakfast or as a wholesome snack any time.
Tags
White Chocolate Peanut Butter Balls
This White Chocolate Peanut Butter Balls recipe makes perfectly juicy, tender, and flavorful steak every time! Serve with potatoes and a side salad for an unforgettable dinner in under 30 minutes.
Instructions
Combine the filling
In a mixing bowl, beat together 3/4 cup creamy no-stir peanut butter, 1/2 cup cane sugar, 1/8 teaspoon salt, 1/4 cup coconut flour, and 2 tablespoons powdered sugar until combined and smooth. Use a hand mixer or stand mixer for 45–60 seconds and scrape the sides.
Portion and shape
Use a mini cookie scoop (about 1 tablespoon) or your hands to form the mixture into 10–12 even balls. Roll to smooth the surface and place on a baking sheet lined with wax paper.
Chill centers
Freeze the baking sheet for 20 minutes to firm the centers. Alternatively, chill in the refrigerator for 30–40 minutes; the goal is a firm center that won’t melt when dipped.
Melt white chocolate
Place 2 cups white chocolate chips in a microwave-safe bowl. Heat in 20–30 second bursts, stirring between intervals, until smooth. Do not overheat to avoid seizing.
Dip and top
Dip each chilled center into the melted white chocolate, tapping off excess with a fork and transferring back to the wax-paper-lined sheet with a toothpick. Immediately sprinkle with flaked sea salt.
Set and drizzle
Refrigerate for 15 minutes to set. Warm remaining chocolate, place in a small zipper bag, snip a tiny corner and drizzle over tops, then chill again until fully hardened.
Last Step: Please leave a rating and comment letting us know how you liked this recipe! This helps our business to thrive and continue providing free, high-quality recipes for you.
Nutrition
Did You Make This?
Leave a comment & rating below or tag
@yummique on social media!
Categories:
You might also like...

Cheesy Zucchini Rollatini Bake
Tender grilled zucchini wraps basil ricotta, bathed in marinara and mozzarella, baking into a bubbly, lighter Italian comfort dinner ready in 30 minutes.

Air Fryer Zucchini and Squash
Crisp-edged, tender-in-the-middle zucchini and yellow squash made in 15 minutes with pantry spices. A vibrant, veggie-forward side everyone devours.

Chicken Meatball Parmesan
Tender chicken meatballs simmered in rich marinara and blanketed with melty mozzarella, bringing all the flavors of chicken parm in cozy, bite-sized form.
Did You Make This?
Leave a comment & rating below or tag @yummique on social media!
Rate This Recipe
Share This Recipe
Enjoyed this recipe? Share it with friends and family, and don't forget to leave a review!
Comments (1)
This recipe looks amazing! Can't wait to try it.
Comments are stored locally in your browser. Server comments are displayed alongside your local comments.

Hi, I'm Amira!
What's Popular

30-Minute Meals!
Join to receive our email series which contains a round-up of some of our quick and easy family favorite recipes.