
>>

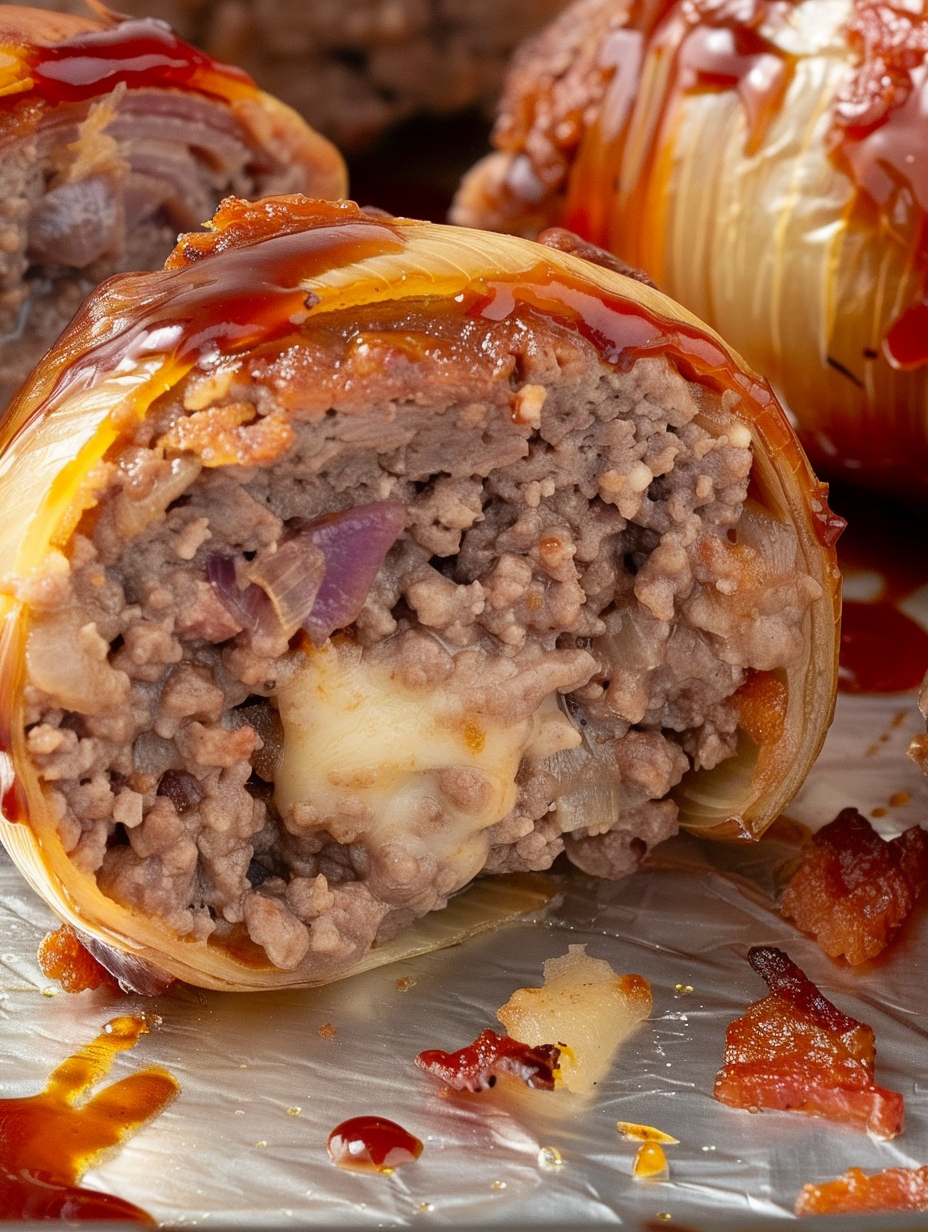
Juicy beef and smoky bacon tucked inside sweet onion layers, filled with melty cheddar and finished with a caramelized barbecue glaze — the ultimate crowd-pleasing appetizer or main.
I’ve served these at family gatherings and small dinner parties — they always spark conversation. One winter evening I made them for eight, and my kids declared them "grown-up cheeseburger bombs;" even picky eaters cleaned their plates. The recipe scales well and the layering technique taught me how to use ordinary onions as a functional, flavorful wrapper.

My favorite part is the moment you cut into one and the cheddar oozes out — it’s theatrical, comforting, and always gets the biggest reaction. At a holiday potluck, I watched neighbors trade pieces just to try different flavor combinations; it’s a great conversation starter and brings people together over a shared, hands-on eating experience.

Store leftovers in an airtight container in the refrigerator for up to 48 hours. To reheat, preheat the oven to 350°F and place the onion bombs on a wire rack over a sheet pan to allow air circulation; heat for 12–15 minutes until warmed through. For freezer storage, assemble the bombs but do not glaze; freeze in a single layer on a sheet pan until solid, then transfer to a zip-top bag for up to 3 months. Bake from frozen, adding 10–15 minutes to the baking time and glazing in the final 10–15 minutes so the sauce caramelizes without burning.
If you need variations, swap ground beef for ground turkey or a 80/20 beef for richer flavor (expect slightly more shrinkage). Replace breadcrumbs with crushed saltine crackers or gluten-free crumbs to accommodate allergies. For dairy-free options, use a vegan cheese cube that melts well or omit the cheese entirely and add a 1/2 teaspoon smoked paprika to the mix for extra depth. Swap center-cut bacon for thick-cut pancetta if you prefer a different smoke profile; adjust cooking time slightly to ensure crispness.
Serve as an appetizer on a platter with extra barbecue sauce and pickles for brightness, or present as a main with a crisp green salad, roasted potatoes, or coleslaw to cut through the richness. Garnish with chopped chives or parsley for color and a sprinkle of flaky salt just before serving to elevate the savory notes. For a party, pair with small slider buns and let guests make their own mini sandwiches.
While not a traditional regional dish, these combine elements of American comfort cooking — the cheeseburger, smoky bacon, and barbecue glaze — into a portable, shareable format. They draw inspiration from stuffed vegetable techniques found worldwide (think stuffed peppers and onions) but are rooted in the American barbecue and diner flavors that celebrate bold, familiar tastes. They showcase how simple pantry staples can be reconfigured into a playful, modern classic.
In summer, use a sweet-and-spicy barbecue sauce with a chipotle kick and serve alongside corn-on-the-cob; in fall or winter, try a molasses-based sauce and swap cheddar for smoked gouda for cozy depth. For holiday gatherings, add a teaspoon of finely chopped fresh rosemary to the meat mixture and use maple-cured bacon to echo seasonal flavors. Lighten it in spring with a side of lemony arugula salad to refresh the palate.
Assemble bombs a day ahead and refrigerate on the baking sheet covered loosely with plastic wrap; this firms the meat, making the bacon wrap tighter and the final result neater. For batch cooking, freeze unbaked bombs on a sheet tray, then store in labeled freezer bags. For a week of lunches, bake and cool, then portion into airtight containers and reheat individually in a 350°F oven or air fryer for 6–8 minutes for a quick, satisfying meal.
These onion bombs are a joyful blend of technique and comfort — simple ingredients arranged with intention deliver maximum flavor and a touch of theatrics at the table. Make them your own with different cheeses, sauces, and sides, and enjoy the way they bring people together.
Press the meat mixture tightly around the cheese to prevent leakage as the cheese melts.
Use a meat thermometer to verify the center reaches 160–165°F for food safety.
Brush barbecue sauce in the last 10–15 minutes of baking to avoid burning the glaze.
Soak stubborn onion layers in hot water for 3–4 minutes to separate without breaking them.
This nourishing onion bombs — bacon-wrapped beef & cheddar recipe is sure to be a staple in your kitchen. Enjoy every moist, high protein slice — it is perfect for breakfast or as a wholesome snack any time.
Yes — assemble up to 24 hours ahead, keep covered in the refrigerator, and bake from chilled, adding 5–10 minutes to the baking time.
Freeze unbaked for up to 3 months on a sheet pan, then transfer to a freezer bag. Bake from frozen with extra time.
This Onion Bombs — Bacon-Wrapped Beef & Cheddar recipe makes perfectly juicy, tender, and flavorful steak every time! Serve with potatoes and a side salad for an unforgettable dinner in under 30 minutes.
Preheat oven to 425°F. Line a large-rimmed baking sheet with aluminum foil and optionally place a wire rack for even crisping.
Trim top and bottom off each onion, peel, slice in half top-to-bottom, and remove the two outer layers from each half; soak briefly in hot water if layers cling.
Combine ground beef, breadcrumbs, egg, milk, 3 tablespoons barbecue sauce, garlic powder, onion powder, salt, and pepper. Mix until evenly combined but not overworked.
Divide mixture into 8 portions, flatten each to a 3–4 inch disc, place a cheddar cube in the center, and wrap the meat tightly around the cheese to form a sealed ball.
Place two onion layers on either side of each meatball, set on two bacon slices laid in an X, then wrap bacon up around the bomb and secure with a toothpick if necessary.
Bake for 30 minutes, remove and brush with the remaining 1/3 cup barbecue sauce, then return to oven for 10–15 minutes until caramelized and internal temperature reaches 160–165°F.
Allow to cool for 5 minutes before serving to let juices redistribute and cheese set slightly for cleaner bites.
Last Step: Please leave a rating and comment letting us know how you liked this recipe! This helps our business to thrive and continue providing free, high-quality recipes for you.
Leave a comment & rating below or tag
@yummique on social media!

Tender grilled zucchini wraps basil ricotta, bathed in marinara and mozzarella, baking into a bubbly, lighter Italian comfort dinner ready in 30 minutes.

Crisp-edged, tender-in-the-middle zucchini and yellow squash made in 15 minutes with pantry spices. A vibrant, veggie-forward side everyone devours.

Tender chicken meatballs simmered in rich marinara and blanketed with melty mozzarella, bringing all the flavors of chicken parm in cozy, bite-sized form.
Leave a comment & rating below or tag @yummique on social media!
Enjoyed this recipe? Share it with friends and family, and don't forget to leave a review!
This recipe looks amazing! Can't wait to try it.
Comments are stored locally in your browser. Server comments are displayed alongside your local comments.

Join to receive our email series which contains a round-up of some of our quick and easy family favorite recipes.
