Fiesta Chicken Casserole | Yummique
30-MINUTE MEALS! Get the email series now
Yummique

Fiesta Chicken Casserole

5 from 1 vote
1 Comments
Amira
By: AmiraUpdated: Dec 23, 2025
This post may contain affiliate links. Please read our disclosure policy.

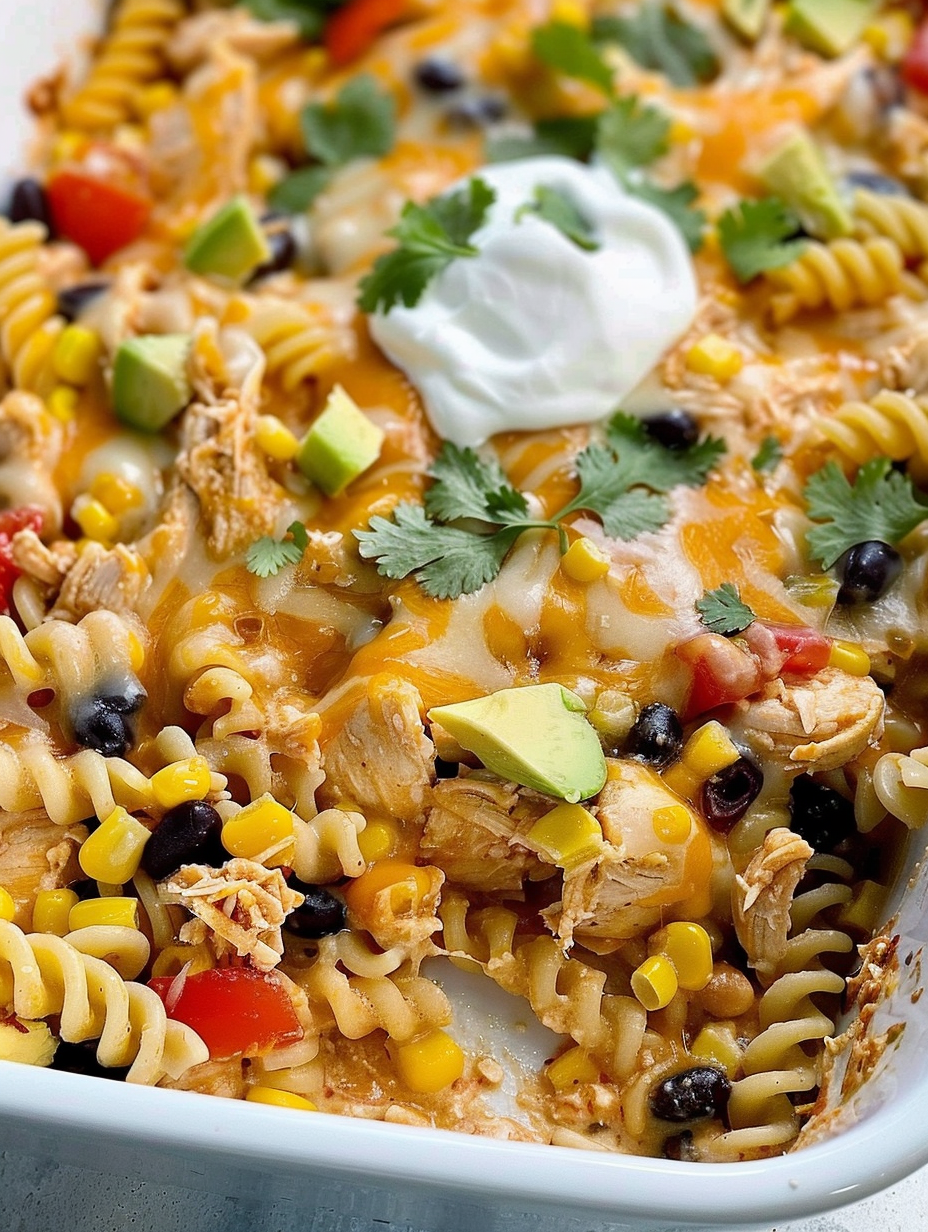
An easy, crowd-pleasing one-dish casserole loaded with tender chicken, rotini pasta, corn, black beans, zesty taco seasoning and melty cheese—perfect for weeknights and potlucks.

Fiesta Chicken Casserole
This Fiesta Chicken Casserole has been a weeknight favorite in my kitchen since I first threw together leftover chicken and jarred salsa on a hectic Tuesday evening. I discovered this combination years ago when I needed something fast, filling, and adaptable to whatever was in the fridge. The bright, slightly smoky notes from taco seasoning and salsa balance the creamy tang of sour cream, while melted cheese ties everything together into a comforting, handheld-bite texture. It’s the sort of dish that disappears quickly at family dinners, and my kids now expect a second helping whenever I bring it to the table. What makes this version special is the balance between ease and flavor: the pasta cooks while you mix the sauce, and the whole casserole finishes in the oven, leaving you free to prepare a quick salad or set the table. The texture is a pleasing contrast of tender rotini, soft chicken chunks, and the occasional pop of corn. I’ve tweaked the seasonings over time—adding a packet of mild taco seasoning alongside a touch of cumin, garlic, and onion powders—to give the dish consistent flavor without overpowering guests who prefer a milder profile. This recipe is forgiving, pantry-friendly, and scales well for company.

Why You'll Love This Recipe

  • This comes together in about 40 minutes total: 15 minutes active prep and 25 minutes in the oven, making it ideal for busy weeknights.
  • Uses pantry staples and everyday refrigerated items: rotini, canned corn and black beans, jarred salsa, sour cream, and shredded cheese.
  • Make-ahead friendly: assemble, cover, and refrigerate for up to 24 hours before baking—great for potlucks and meal prep.
  • Crowd-pleasing comfort that also plays well for picky eaters; customize heat with hot taco seasoning or jalapeños for those who want spice.
  • One-dish cooking minimizes cleanup and keeps the oven doing the heavy lifting while you prepare a simple side.

I first served this at a casual family gathering, and it disappeared faster than I expected—people kept coming back for a scoop. Over time I've adjusted pasta and chicken quantities to ensure every bite has a little of everything. It’s forgiving enough that even cooks newer to the kitchen can follow it confidently, and the layered flavors reward small tweaks like using a fresh refrigerated salsa or a sharper cheddar.

Ingredients

  • Rotini pasta (2 1/2 cups uncooked): I use spiral rotini because its grooves hold the creamy salsa-sour-cream sauce. You can substitute penne or shells. Look for a reliable brand for consistent cooking.
  • Sour cream (1 cup): Adds tang and creaminess; full-fat gives the richest texture, but light sour cream also works. Stir it smooth before mixing so it blends evenly.
  • Salsa (1 cup): Choose a refrigerated fresh salsa from the produce section for brightness, or a good-quality jarred salsa for convenience. Mild or medium works based on your preference.
  • Mild taco seasoning (1 packet): The seasoning packet provides balanced spice, cumin, and chili flavors; use a hot packet to increase heat.
  • Spices (1/2 tsp each cumin, garlic powder, onion powder): These boost the salsa’s flavor and round out the dish without adding heat—measure carefully for balanced seasoning.
  • Canned corn (1 can, 15 oz, drained): Sweet corn kernels add a pleasant pop and color contrast—drain well to avoid extra liquid.
  • Canned black beans (1 can, 15 oz, drained and rinsed): Rinse thoroughly to remove canning liquid and reduce sodium; provides protein, fiber, and a creamy texture.
  • Cooked chicken (2 1/2 cups): Use shredded rotisserie chicken or poached breasts cut into chunks; using pre-cooked chicken speeds assembly.
  • Shredded cheese (2 cups): I like Colby Jack for meltiness and mild flavor; Monterey Jack, Pepper Jack, or cheddar are excellent alternatives.

Instructions

Step 1 — Preheat and prep the pan: Preheat the oven to 350°F (175°C). Grease a 9x13-inch baking dish with cooking spray and set aside so it’s ready when the filling is combined. This prevents sticking and ensures even browning at the edges. Step 2 — Cook the pasta: Bring a large pot of salted water to a rolling boil and cook 2 1/2 cups uncooked rotini until al dente—follow the package timing, usually about 8–10 minutes. Salt the water generously (about 1 teaspoon) to season the pasta from the inside. Drain but do not rinse; the residual starch helps the sauce cling to the noodles. Step 3 — Make the creamy salsa mixture: In a large mixing bowl, whisk together 1 cup sour cream, 1 cup salsa, 1 packet mild taco seasoning, 1/2 teaspoon cumin, 1/2 teaspoon garlic powder, and 1/2 teaspoon onion powder until smooth. Taste and adjust—if it seems too tangy, add a tablespoon more salsa; if mildness is preferred, reduce the taco seasoning slightly. Step 4 — Combine the filling: Add the drained hot pasta to the sour cream mixture and stir to coat evenly. Fold in 1 can (15 oz) drained corn, 1 can (15 oz) drained and rinsed black beans, 2 1/2 cups cooked chicken, and 1 cup shredded cheese. Mix gently until distributed so every scoop will have chicken, beans, and sauce. Step 5 — Bake: Transfer the mixture to the prepared 9x13-inch dish and smooth the top. Sprinkle the remaining 1 cup shredded cheese evenly over the surface. Cover tightly with aluminum foil and bake at 350°F for 20 minutes. Remove foil and bake an additional 5 minutes to let the cheese bubble and brown slightly. Step 6 — Garnish and serve: Let the casserole rest for 5 minutes before serving. Garnish individual portions with a dollop of sour cream, diced tomato, chopped cilantro, and avocado slices or jalapeño rings if desired. Serve warm. User provided content image 1

You Must Know

  • This dish yields about 8 servings and keeps well refrigerated for 3–4 days in an airtight container; reheat covered at 350°F until warmed through.
  • Freezes well: portion into freezer-safe containers and freeze up to 3 months. Thaw overnight in the fridge and reheat gently to avoid drying the chicken.
  • High in protein and fiber thanks to chicken and black beans—each serving is hearty and satisfying.
  • Watch sodium: canned ingredients and taco seasoning add salt. Use low-sodium beans and salsa if you need to cut back.

My favorite aspect is how adaptable it is—switch the cheese, use leftover turkey, or add roasted peppers depending on the season. The family loves the crispy edges after the final uncovered bake; it creates texture contrast that keeps everyone coming back for seconds. I often double the recipe for gatherings because it travels well and stays comforting even when served buffet-style.

User provided content image 2

Storage Tips

Store leftovers in an airtight container in the refrigerator for up to 3–4 days. For longer storage, freeze in meal-sized portions in freezer-safe containers or heavy-duty freezer bags for up to 3 months—label with the date. To reheat from frozen, thaw in the refrigerator overnight and reheat in a 350°F oven, covered with foil, until heated through (about 20–30 minutes). For quick reheating, microwave individual portions on medium power, stirring halfway through for even warmth.

Ingredient Substitutions

Swap pasta types without significant texture loss: shells, penne, or elbow macaroni are all good substitutes. For dairy-free versions, use a vegan sour cream and dairy-free shredded cheese; be mindful that meltability varies by brand. Replace canned corn with frozen (thawed) corn if preferred. For a lower-sodium option, use low-sodium beans and a reduced-salt taco seasoning—taste and adjust seasoning before baking. Rotisserie chicken is a convenient shortcut, while roasted poblano or canned diced green chiles add smoky heat.

Serving Suggestions

Serve this casserole with a crisp green salad dressed in lime vinaigrette and a side of tortilla chips or warm soft tortillas. Garnish with cilantro, diced tomatoes, sliced avocado, pickled red onions, or a squeeze of lime for brightness. For a lighter meal, pair with steamed vegetables; for heartier gatherings, add a side of Mexican rice or refried beans. Top individual servings with hot sauce or chopped jalapeños for those who want extra heat.

Cultural Background

This casserole blends Tex-Mex flavors—taco seasoning, salsa, corn, and black beans—with classic American comfort-casserole technique: combining starch, protein, and dairy in one baked dish. One-dish casseroles became popular in mid-20th-century America for convenience, but this variation borrows from Southwestern ingredients to create a flavorful hybrid that’s now common at potlucks and family dinners across the United States.

Seasonal Adaptations

In summer swap jarred salsa for fresh pico de gallo and add grilled corn and charred peppers for brightness. In winter, use a roasted red-pepper salsa for depth, and add a handful of chopped kale or wilted spinach for added greens. Holiday variations can feature leftover turkey instead of chicken, and topping with a crunchy panko-cheese mix before baking adds festive texture.

Meal Prep Tips

Assemble the casserole up to 24 hours ahead; cover and refrigerate until ready to bake—this deepens the flavors. If preparing for meal prep, portion into individual microwave-safe containers for quick lunches. For freezing, bake first, cool completely, then portion and freeze; this preserves texture better than freezing raw pasta. Label containers with reheating instructions to make weeknight meals effortless.

Bring this casserole to your next potluck or weeknight meal and watch how quickly it becomes someone's new favorite comfort dish—then tweak it to make it your own. The joy is in the ease and the way simple pantry staples transform into something warm, cheesy, and deeply satisfying.

Pro Tips

  • Salt the pasta water well—about 1 teaspoon per 4 quarts—to season the noodles internally.

  • Drain canned ingredients thoroughly to avoid a watery casserole.

  • Let the casserole rest 5 minutes after baking so it sets for cleaner slices.

  • Use rotisserie chicken to save time and add extra flavor with minimal effort.

This nourishing fiesta chicken casserole recipe is sure to be a staple in your kitchen. Enjoy every moist, high protein slice — it is perfect for breakfast or as a wholesome snack any time.

FAQs about Recipes

Can I make this ahead?

Yes. Assemble and refrigerate covered for up to 24 hours, then bake as directed; you may need an extra 5–10 minutes if chilled straight from the fridge.

What size dish should I use?

Use a 9x13-inch baking dish and cover tightly with foil for the first part of baking, then remove to allow the cheese to brown.

Tags

Family-FriendlyMain CourseDinnerCasseroleChickenFiestaWeeknight
No ratings yet

Fiesta Chicken Casserole

This Fiesta Chicken Casserole recipe makes perfectly juicy, tender, and flavorful steak every time! Serve with potatoes and a side salad for an unforgettable dinner in under 30 minutes.

Servings: 8 steaks
Fiesta Chicken Casserole
Prep:15 minutes
Cook:25 minutes
Rest Time:10 mins
Total:40 minutes

Ingredients

Main

Instructions

1

Preheat and Prepare Dish

Preheat oven to 350°F. Grease a 9x13-inch baking dish with cooking spray and set aside.

2

Cook Pasta

Bring a large pot of salted water to a boil and cook 2 1/2 cups uncooked rotini until al dente, about 8–10 minutes. Drain and do not rinse.

3

Mix Sauce

In a large bowl, whisk 1 cup sour cream, 1 cup salsa, 1 packet mild taco seasoning, 1/2 teaspoon cumin, 1/2 teaspoon garlic powder, and 1/2 teaspoon onion powder until smooth.

4

Combine Filling

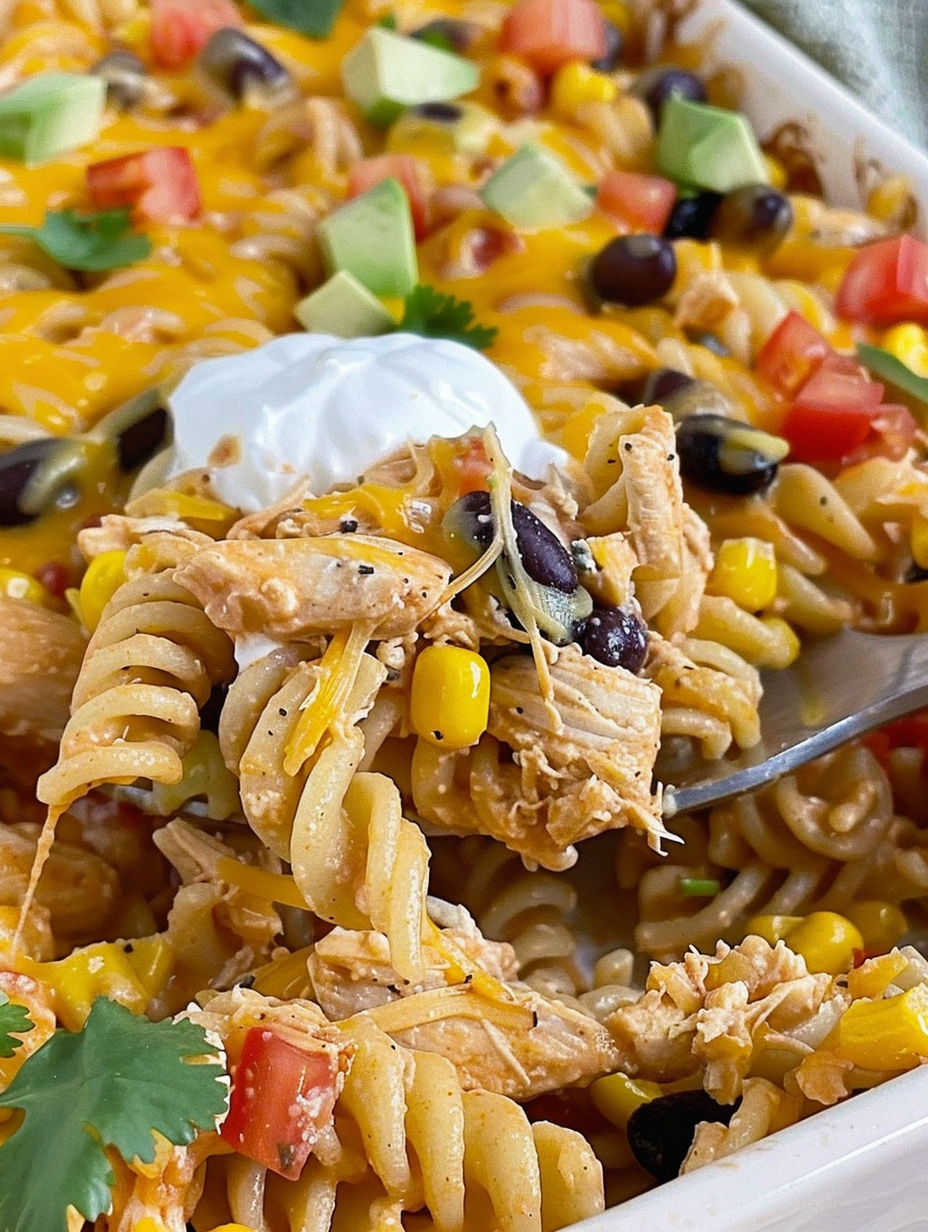
Add drained pasta to the sauce and stir to coat. Fold in drained corn, rinsed black beans, 2 1/2 cups cooked chicken, and 1 cup shredded cheese until evenly combined.

5

Bake Covered then Uncovered

Pour mixture into prepared dish, top with remaining 1 cup cheese, cover with foil and bake 20 minutes. Remove foil and bake 5 more minutes until cheese is bubbly.

6

Rest and Serve

Allow the casserole to rest 5 minutes before serving. Garnish with sour cream, diced tomato, chopped cilantro, and avocado if desired.

Last Step: Please leave a rating and comment letting us know how you liked this recipe! This helps our business to thrive and continue providing free, high-quality recipes for you.

Nutrition

Calories: 372kcal | Carbohydrates: 33g | Protein:
25g | Fat: 15g | Saturated Fat: 5g |
Polyunsaturated Fat: 3g | Monounsaturated Fat:
6g | Trans Fat: 1g | Cholesterol: 253mg | Sodium:
0mg | Potassium: 953mg | Fiber: 0g | Sugar:
0g | Vitamin A: 577IU | Vitamin C: 3mg | Calcium:
47mg | Iron: 6mg

Did You Make This?

Leave a comment & rating below or tag
@yummique on social media!

Fiesta Chicken Casserole

Categories:

Fiesta Chicken Casserole

Did You Make This?

Leave a comment & rating below or tag @yummique on social media!

Rate This Recipe

Share This Recipe

Enjoyed this recipe? Share it with friends and family, and don't forget to leave a review!

Comments (1)

Leave a Comment

0/1000 characters
Food Lover
1 day ago

This recipe looks amazing! Can't wait to try it.

Rating:

Comments are stored locally in your browser. Server comments are displayed alongside your local comments.

Family photo

Hi, I'm Amira!

Chef and recipe creator specializing in delicious Family-Friendly cooking. Passionate about sharing easy-to-follow recipes that bring families together around the dinner table.

30-Minute Meals!

Join to receive our email series which contains a round-up of some of our quick and easy family favorite recipes.